To prepare documents for scanning, remove staples and clips, sort pages into logical groups, repair damaged sheets, flag special items, and label every box clearly. Good preparation before pickup helps prevent jams, missing pages, and avoidable delays, so your files come back complete.
Most scanning problems start long before a page touches the scanner. A staple left in a file, a sticky note over a signature, or a box packed in no particular order can slow a job or cause missed pages. Solid document scanning preparation takes the guesswork out of the process. In this guide, you will find a practical scanning checklist to follow, a table of details to gather before requesting a quote, and questions to ask your provider.
Key Takeaways
- Remove all metal and clips first.
- Sort and group files before boxing so they return in the order you expect.
- Flag fragile, oversized, and confidential items.
- Decide on file names, folders, and OCR needs before pickup.
- Ask your provider which preparation tasks they handle.
Why Preparation Comes Before the Scanner
Production scanners pull pages through at speed, so a staple, a curled corner, or a loose receipt can stop the machine or damage the page. Careful document scanning preparation also shapes the result, because pages grouped by client, case, or date turn into files that are easy to name and search.
When you prepare paper documents well, your provider spends less time fixing problems and more time scanning. Good preparation also keeps the project predictable. Clean, organized files help your provider quote with more confidence and spend extra time only on the pages that truly need careful attention.
A Step-by-Step Checklist to Prepare Documents for Scanning
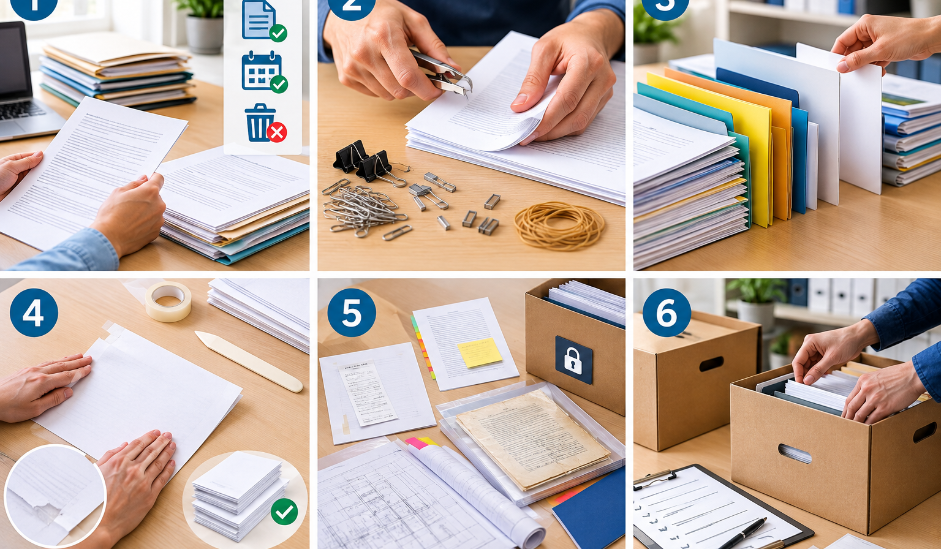
Work through these steps in order, and finish one box before starting the next. Each step builds on the one before it, so careful early steps save time later and keep every box consistent.
Step 1: Decide What Gets Scanned
Identify what type of documents, years, and files are included. Hold off on disposing of duplicate and obsolete documents until you determine your retention policy.
Step 2: Remove Staples, Clips and Bindings
Take out staples, paper clips, binder clips and rubber bands. Fan each stack to release small fragments, since loose metal can jam scanners.
Step 3: Sort and Group Your Files
Keep papers in the order your team already uses if that order matters. Otherwise, group them by client, case, patient, vendor, or year. Use a plain sheet or folder as a divider between groups.
Step 4: Repair and Flatten Pages
Unfold corners, smooth wrinkles and mend small tears with tape on the blank side where possible. Check that every page is right side up and complete, including signatures and dates. Ask before taping valuable or historic items.
Step 5: Flag Special Items
Tape small receipts flat onto a plain sheet and copy the details from sticky notes onto a separate page before removing them. Set fragile pages and oversized drawings aside, keep them flat, and mark each with a visible slip of paper. Keep confidential records in their own labeled box, and ask about large-format scanning for drawings.
Step 6: Label and Pack the Boxes
Number every box and keep a simple list of what each one holds. Avoid overfilling, since packed boxes crush pages.
Project Details to Gather Before You Request a Quote
Sharing these details up front keeps the quoting process quick and avoids repeat questions. You do not need exact numbers for every item, since a reasonable estimate is enough to get the conversation started.
| Detail | What to Share | Why It Helps |
| Box count | Total boxes and approximate page volume | Helps estimate time and cost |
| Document types | Invoices, contracts, charts, drawings, and so on | Different types may need different handling |
| Naming and folders | How files should be named and organized | Makes finished files easy to search |
| Deadline | The date you need files back | Lets your provider plan the work |
| Contact person | One person who can answer questions | Keeps small questions from stalling the job |
| Pickup details | Address, building access, and parking notes | Helps avoid missed or delayed pickups |
What to Ask About Document Preparation Services
Some providers include preparation in the quote, some charge for it separately, and some expect files to arrive ready to scan. Before pickup, ask:
- Which tasks do you handle, such as staple removal and sorting?
- How will you keep the original order of my files?
- Do you flag pages that are damaged or hard to read?
- How are confidential records handled and tracked?
Document preparation services can be especially useful on large or mixed collections, where sorting and repairs can take longer than scanning. Ask what the quote includes and whether extra preparation affects pricing.
Conclusion
Taking the time to prepare documents for scanning is one of the simplest ways to protect your schedule and your records. Work through the scanning checklist above one box at a time, and flag anything unusual instead of guessing. Small habits, such as removing metal and keeping files in order, add up to cleaner images and fewer questions later. You do not need perfect preparation to see real results. Even a partial pass through your boxes can reduce problems, and your provider can explain which remaining tasks they handle.
If you are unsure about a particular box, ask before you start. Access Scanning works with files in all shapes and states, and a short conversation about your documents can prevent unnecessary rework.
FAQs
How long does document preparation take?
It depends on volume, condition, and how organized your files already are. A neat, foldered box takes far less time than loose paper, so prepare one sample box first and time it.
Should I scan originals or photocopies?
Scan originals when possible, because photocopies can lose detail. Use copies only when the original must stay in use, and tell your provider which version you are sending.
Should I remove blank pages before scanning?
Many providers can remove blank pages automatically. If you need them kept for audits or page counts, say so before the project starts, and keep any page that has writing on either side.
What happens to my originals after scanning?
That depends on your instructions. Originals can usually be returned, stored, or shredded securely. Confirm the plan, along with your retention requirements, before pickup so nothing is destroyed too early.
Which file format should I choose for scanned documents?
Common choices are searchable PDF, TIFF, and JPEG. Searchable PDFs with OCR suit most office records. Decide on your format ahead of time, so files arrive the way your team needs them.
Request a Quote for Your Scanning Project
Request your quote today and get clear answers on timing, pricing, and next steps. Share your box count and document types, and our team will guide you from there.